AI Photo Booth Prompt Guide: Create Better AI Effects
Learn how to write better AI photo booth prompts, create more consistent AI effects, use reference images, and get stronger results at every event.

September 1, 2026
The Snappic team is passionate about creating unforgettable photo booth experiences.
Great AI photo booth effects do not happen by accident.
The prompt matters, but it is only one part of the process. The quality of the original guest photo, the AI model you select, the way guests pose, your reference images, and the testing you do before the event can all affect the final result.
A strong AI experience brings all of these elements together.
When everything is set up properly, an ordinary booth photo can become a cinematic portrait, a magazine cover, a fantasy character, a branded campaign visual, or almost anything else you can imagine.
In this guide, we will cover how prompting works in Snappic, how to structure a better prompt, how to use reference images and Face Likeness, how to direct guests at the booth, and how to test your effects before event day.
What does an AI prompt do?
An AI prompt tells the image model what you want the final image to look like. When a guest takes a photo, Snappic sends the captured image to the selected AI model along with your prompt and any additional settings you have chosen.
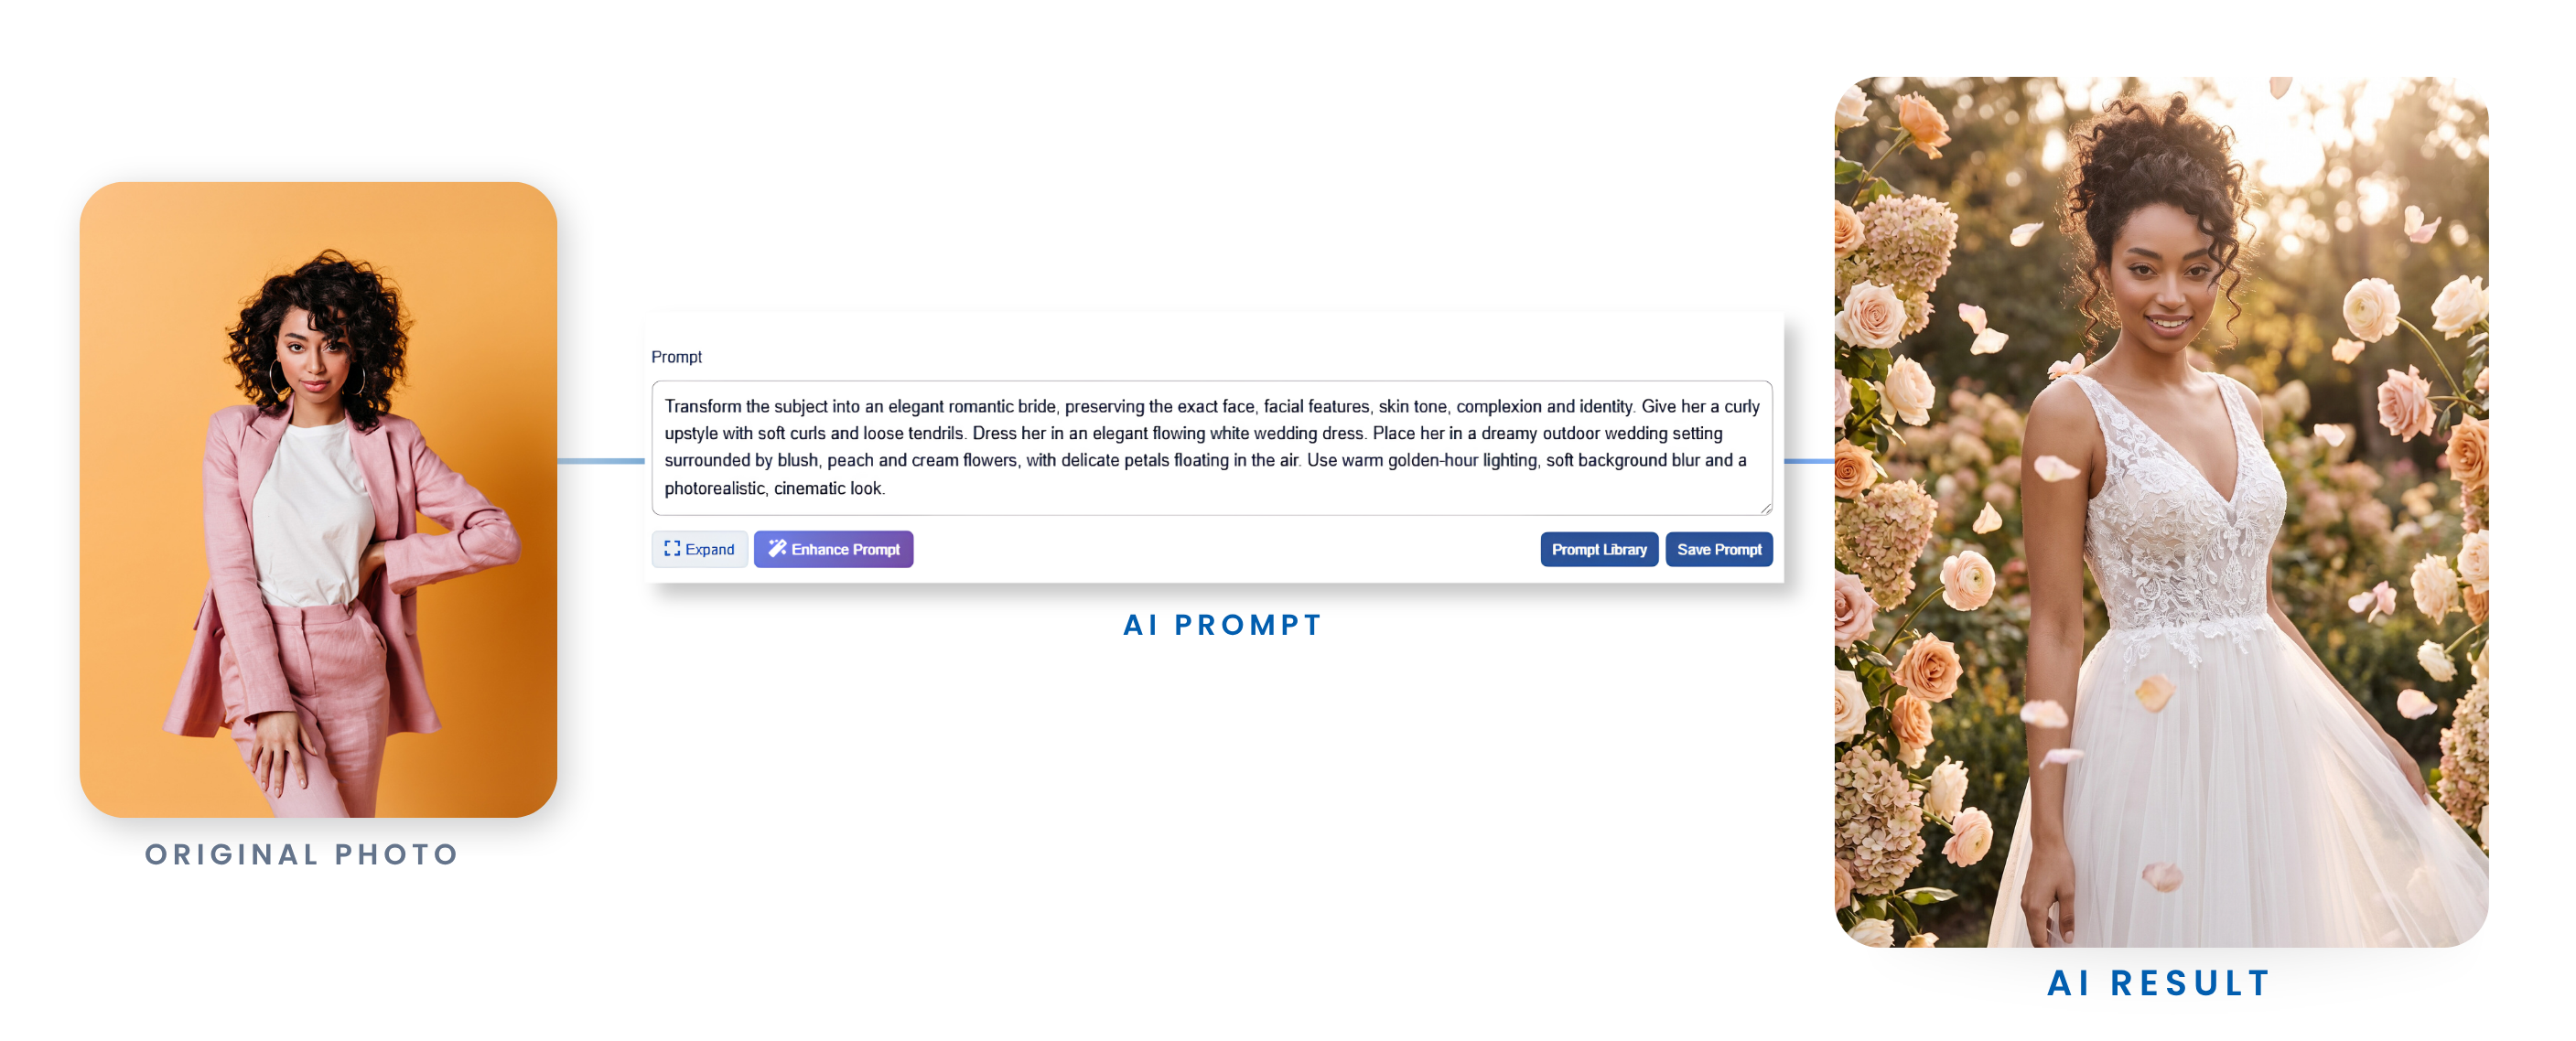
- how the guest is transformed
- what they are wearing
- where they appear
- what they are doing
- the visual style of the image
- the lighting and atmosphere
- the camera framing
- the props and background details
- what should remain recognisable
- what the model should avoid adding or changing
The prompt is not simply a list of attractive words. It should give the AI one clear and consistent visual direction. More detail can help, but only when every instruction supports the same idea. A long prompt filled with conflicting styles can be less effective than a shorter, well-structured one.
Ways to create AI effects in Snappic
Snappic gives you several ways to create an AI experience.
1. Pre-built AI-FX filters
Pre-built filters are the quickest way to get started. You can select an existing effect, such as a professional headshot, caricature, watercolour portrait, superhero transformation, Roaring Twenties character, boxing champion, or another themed style.
These are useful when you need a fast setup or want to offer a selection of ready-made experiences without creating every effect from scratch.
2. Custom Prompt Filters
Custom Prompt Filters give you more creative control. You can write your own prompt, select a model, choose your aspect ratio and pose settings, and use reference images to guide the final result.
This is the best option for:
- branded activations
- themed weddings
- corporate events
- product launches
- seasonal experiences
- unique event concepts
- custom effects created specifically for a client
BananaFX 2.0, BananaFX 3.0 and PersonaFX 2.0 allow you to create realistic or stylised transformations, depending on the selected model and the instructions you provide.
You can also upload up to four reference images where supported, and enable Enhance Face Likeness for realistic effects where stronger guest recognition is needed.
3. Face Swap
Face Swap places a guest’s face into a predefined reference image. It can work well when you already have a finished composition and want the guest to appear as a specific character or subject, such as:
- a movie character
- an athlete in a team uniform
- a person on a magazine cover
- a branded campaign character
- a subject in a fixed themed scene
Face Swap works with one person at a time and uses best-effort matching to adapt the guest’s features to the reference image. It is often a better option than a full transformation when the composition, outfit and pose need to remain closely aligned with a predefined visual.
The Six-Part structure of a Strong AI Photo Booth Prompt
A good prompt should tell the AI exactly what is changing, what should remain recognisable, and how the final image should be composed.
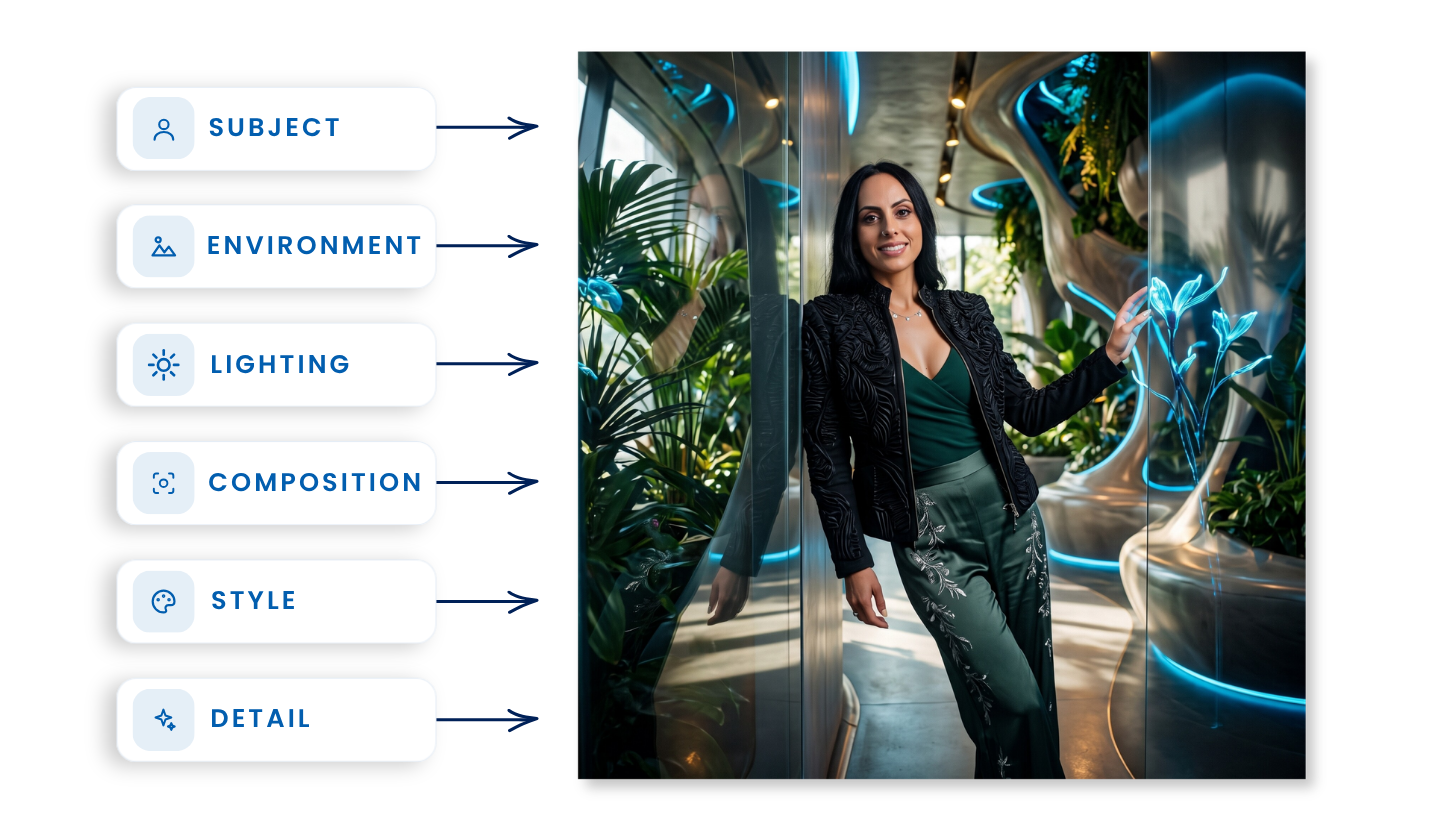
The following structure is a useful starting point:
1. Identify the guest and preserve their identity
Start by telling the AI who is being transformed and which characteristics should remain recognisable.
For example:
Transform the visible guest into a futuristic fashion designer while preserving their recognisable facial features, skin tone, approximate age and body type.
For multiple guests:
Transform all visible guests into members of an elite space exploration crew while keeping each person clearly recognisable as a separate individual.
This is especially important in a photo booth environment. Guests want to see themselves in the final image, not an unrelated AI-generated character.
Useful identity instructions can include:
- preserve recognisable facial features
- maintain the guest’s skin tone
- maintain their approximate age
- maintain their approximate body type
- keep each guest as a separate individual
- retain the number of guests in the original photo
- do not add additional foreground people
Avoid overpromising perfect facial reproduction. AI transformations are still generative, and the result can vary depending on the original photo, pose, model, style and effect settings.
2. Describe the transformation
Next, explain what should change. This may include:
- clothing
- hairstyle
- makeup
- accessories
- character role
- visual theme
- facial expression
- props
Instead of writing:
Make the guest look futuristic.
Try:
Dress the guest in a sculptural silver haute-couture outfit inspired by camera lenses, reflective metal and modern photo booth technology.
Instead of:
Turn them into a pirate.
Try:
Transform the guest into an adventurous pirate captain wearing a detailed weathered coat, leather belts, gold accessories and windswept maritime clothing.
Be clear about whether the model should replace the original outfit or retain it.
For example:
Replace the guest’s current clothing with an elegant black-and-gold Art Deco evening outfit.
Or:
Keep the guest’s original clothing but add subtle futuristic accessories and blue holographic details.
3. Set the pose, action and framing
The guest should feel like part of the scene rather than someone pasted onto a background. Describe what they are doing and how much of their body should be visible.
You might specify:
- close-up portrait
- waist-up composition
- three-quarter portrait
- full-body image
- seated or standing
- facing the camera
- looking slightly to the side
- holding an object
- interacting with the environment
For example:
Show the guest in a confident waist-up pose, facing the camera and holding a transparent holographic camera in one hand.
Or:
Show the guest’s full body standing on a soft cloud, reaching upward towards a smaller cloud floating above them.
If the pose is important, describe it clearly. Do not assume the AI will naturally choose the action you have in mind.
For group photos, avoid asking for complicated movements or dramatically different poses for every person. Results are usually more reliable when the guests remain clearly visible and relatively aligned.
4. Build the environment
Describe where the guest appears and which background elements matter.
Instead of:
A futuristic background.
Try:
Place the guest inside a luxurious futuristic photography studio surrounded by suspended camera lenses, glowing screens and soft blue holographic displays.
Instead of:
A ballroom.
Try:
Place the guest inside an opulent 1920s ballroom with geometric gold detailing, crystal chandeliers, polished floors and softly blurred party guests in the distant background.
The most effective environments usually support the event concept.
For example:
- a botanical gala effect might use floral installations, sculptural foliage and dramatic event lighting
- a technology conference might use a sleek innovation lab with holographic displays
- a wedding effect might use a romantic garden, candlelit ballroom or soft editorial studio
- a sports activation might use a packed stadium, arena tunnel or championship podium
- a holiday effect might use a detailed workshop, snowy town or elegant festive interior
Avoid filling the background with too many unrelated ideas. Give the AI a clear visual hierarchy.
5. Define the visual style, lighting and camera treatment
The same idea can look completely different depending on the visual treatment.
Be specific about whether the final image should be:
- photorealistic
- illustrated
- cinematic
- editorial
- painterly
- comic book inspired
- anime inspired
- vintage
- surreal
- playful
- luxurious
- dramatic
Then add useful photographic or artistic direction.
For example:
Photorealistic luxury fashion campaign, eye-level camera angle, polished studio lighting, crisp facial focus and realistic skin texture.
Or:
Vibrant comic book illustration with bold ink lines, dramatic shadows and saturated colour grading.
Or:
Soft romantic editorial photography with warm golden light, natural skin texture and a gently blurred background.
Try to use descriptions that produce visible changes rather than relying only on generic phrases such as “high quality” or “professional.”
“Professional photography” can mean many different things. It is more useful to specify the type of photography you want, such as:
- luxury beauty editorial
- corporate studio headshot
- cinematic movie still
- vintage fashion campaign
- dramatic sports portrait
- soft wedding editorial
6. Add clear constraints
Finish your prompt with a short set of instructions that protect the composition and reduce recurring problems.
For example:
Keep only the guests visible in the original image. Do not add additional foreground people, cover the guests’ faces, merge their bodies or place text over their features.
Constraints may include:
- keep the same number of guests
- keep each person clearly separate
- do not add extra people
- do not obscure faces
- do not place accessories over the eyes
- do not crop important props
- do not add text
- do not alter the guest’s approximate age
- do not merge bodies or limbs
- avoid exaggerated facial features
- avoid heavily distorted hands
A strong positive instruction should still do most of the work.
Do not rely on a huge negative list to repair an unclear main prompt. First describe the desired image as clearly as possible, then add a few targeted exclusions for problems you identify while testing
A weak AI prompt compared with a strong AI prompt!
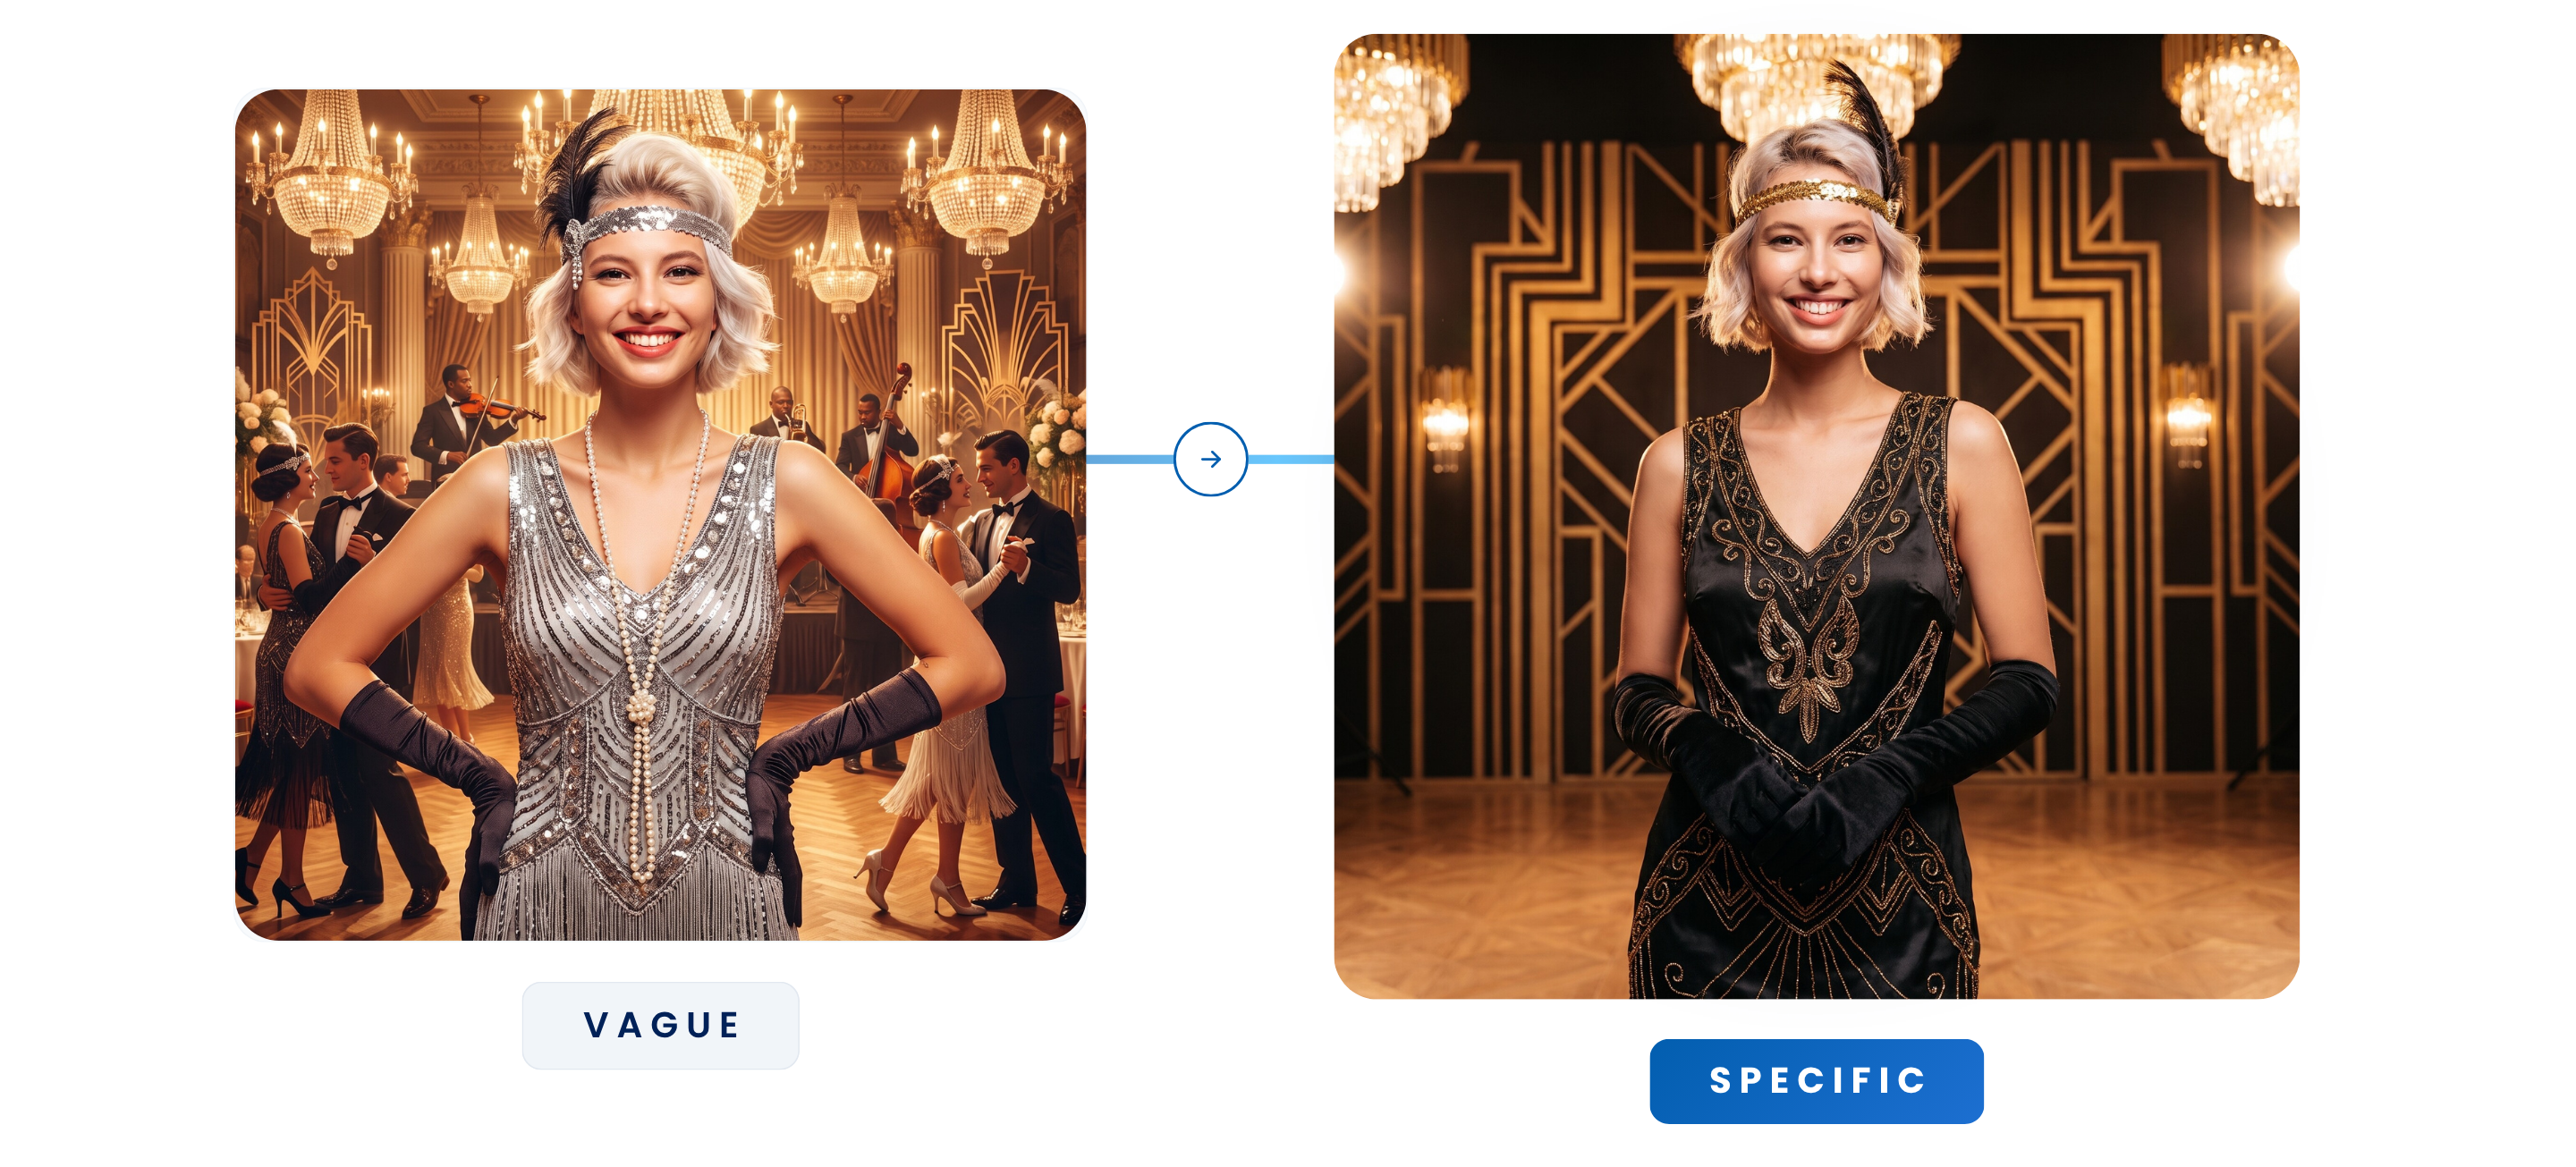
Weak Prompt
A guest at a Gatsby party in a ballroom.
This gives the AI a broad theme, but does not explain:
- what the guest should wear
- whether their identity should be preserved
- how they should pose
- how much of their body should be visible
- what the ballroom should look like
- whether the result should be realistic
- what the AI should avoid changing
Stronger prompt
Transform the visible guest into an elegant 1920s high-society figure while preserving their recognisable facial features, skin tone, approximate age and body type. Replace their clothing with a luxurious black-and-gold Art Deco evening outfit with refined period accessories. Show them in a confident waist-up pose facing the camera inside a grand, empty Art Deco ballroom with geometric gold detailing, crystal chandeliers and warm cinematic lighting. There must be no other people anywhere in the background, including silhouettes, reflections or partially visible figures. Keep the subject’s face unobstructed and maintain realistic skin texture, natural proportions and polished editorial photography. Do not add text or additional people.
Every part of the prompt supports one clear result.
How to use reference images effectively
Reference images can be one of the most useful tools in a custom AI effect. They allow you to guide the AI using an existing visual rather than describing every detail with words.
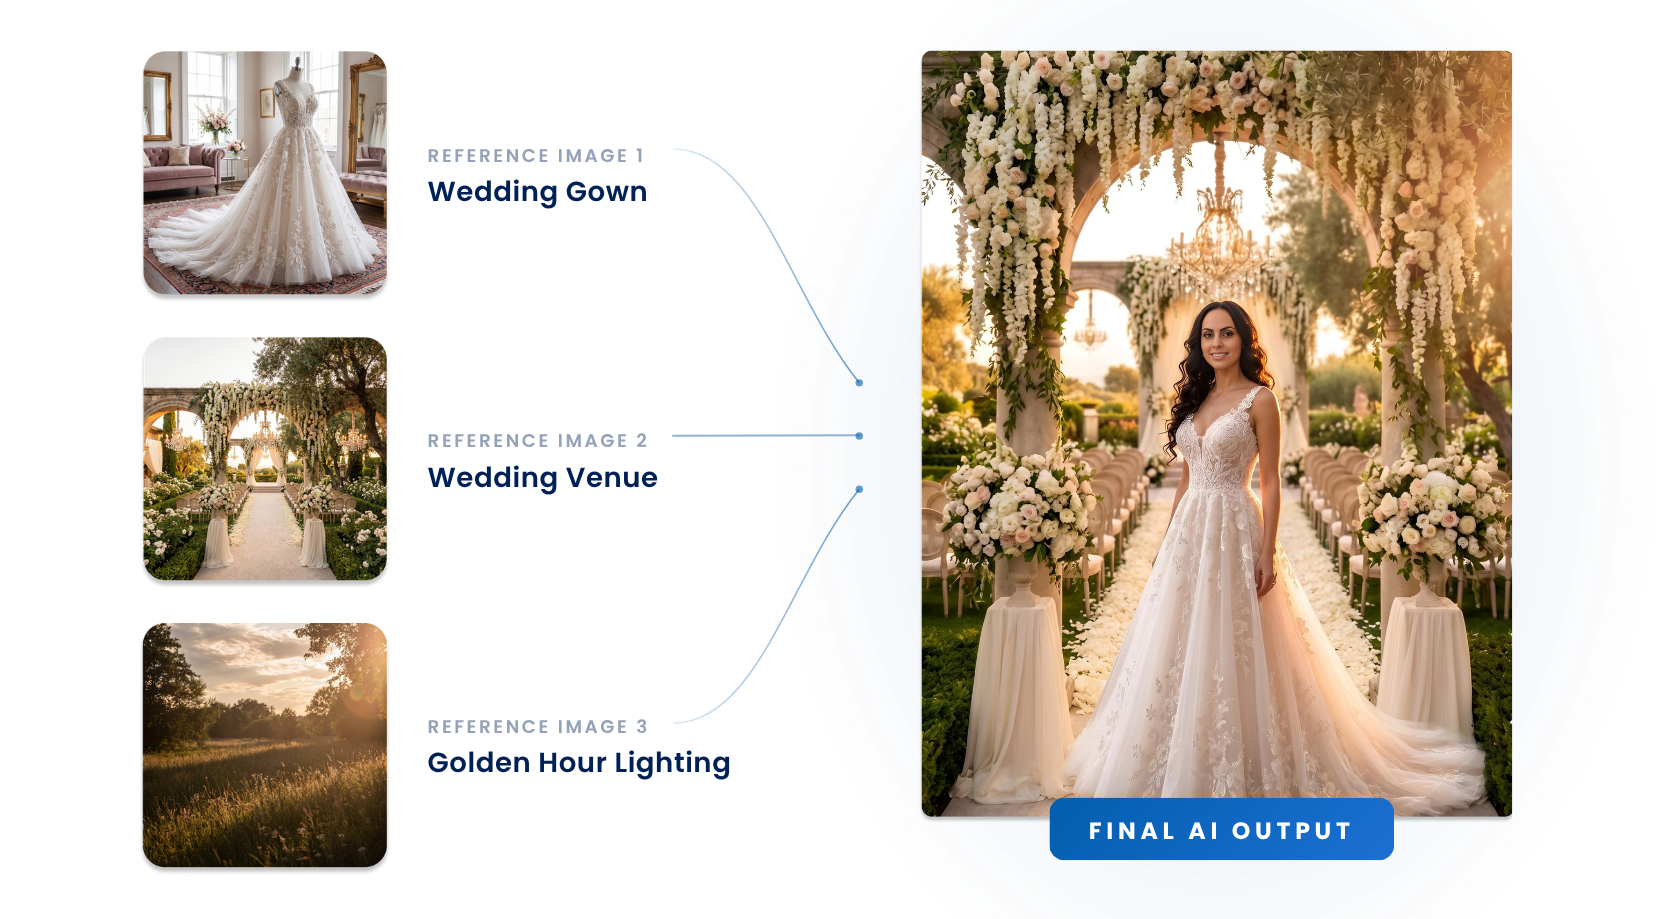
Reference images may be used to guide:
- outfit design
- character styling
- environments
- brand colours
- campaign artwork
- props
- composition
- visual texture
- lighting
- illustration style
However, more reference images do not automatically mean better results. Each image should serve a clear purpose and support the same creative direction.
For example:
- Reference image one: the desired outfit
- Reference image two: the event environment
- Reference image three: the client’s campaign artwork
- Reference image four: a visual style or lighting reference
Where useful, explain the role of the references in your prompt:
Use the first reference image as inspiration for the metallic outfit silhouette and the second reference image for the blue holographic studio environment. Preserve the guest’s identity from the original captured photo.
Avoid uploading four unrelated images simply because the option is available. Conflicting references can make the final result less consistent.
It is also important to remember that reference images guide the model rather than acting as exact design templates. The AI may interpret, simplify or combine elements differently with each generation.
When to use Enhance Face Likeness
Enhance Face Likeness is useful when guest recognition is an important part of a realistic transformation.
Consider enabling it for effects such as:
- professional portraits
- luxury editorials
- realistic movie scenes
- corporate headshots
- historical transformations
- realistic fantasy characters
- branded campaign photography
It is less relevant for heavily stylised results such as cartoons, exaggerated illustrations or abstract artwork, and will not work properly if enabled for these types of outputs.
Even with Face Likeness enabled, the original photo still matters. Guest likeness may be reduced when:
- the face is partly hidden
- the guest is wearing a cap
- the guest is looking far away from the camera
- the image is dark or blurred
- the guest is making an exaggerated expression
- the prompt dramatically changes their age
- the transformation heavily stylises the face
- the requested pose is very different from the original
- the head or face is extremely small in the frame
Face Likeness should support a strong source image and well-structured prompt. It cannot fully compensate for a poor-quality original photo.
How guests should pose for the best AI results
A well-written prompt can still produce inconsistent results if the original guest photo is unclear. For the best outcome, booth attendants should briefly guide guests before taking the picture. The clearer the original image is, the more reliable the final transformation is likely to be.
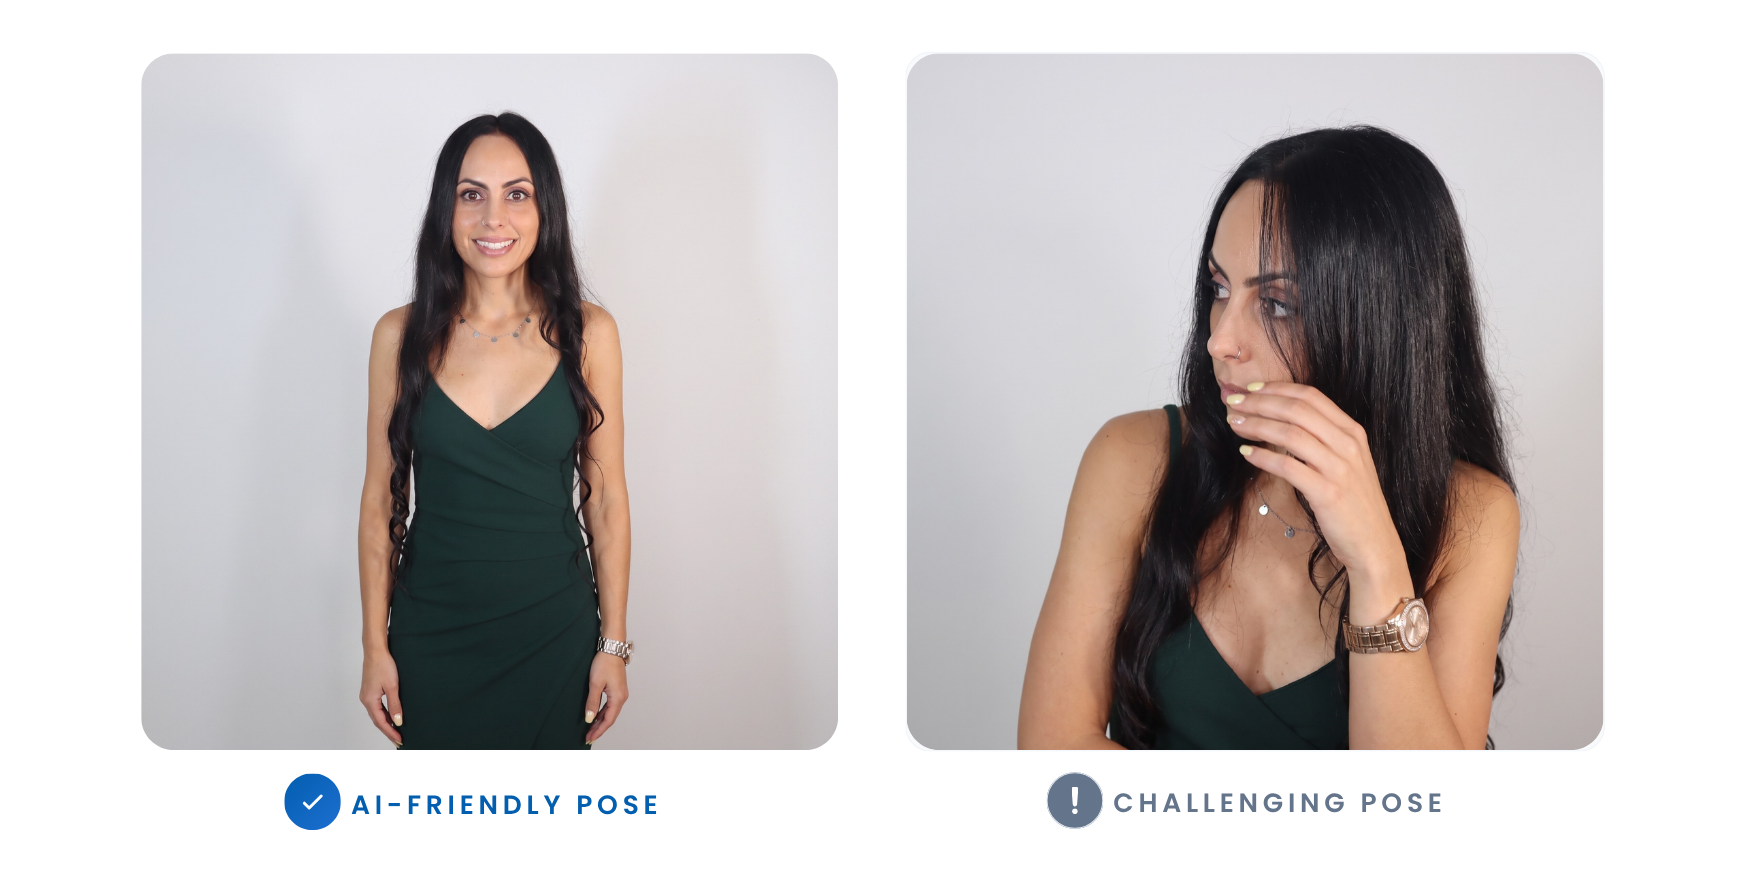
1. Ask guests to face forward
Guests should face the camera as directly as possible. A forward-facing portrait gives the AI a clearer view of:
- both eyes
- the shape of the face
- the nose
- the mouth
- the hairline
- facial proportions
Side profiles and heavily tilted heads may still work, but they give the model less information and can reduce facial similarity.
For most effects, ask guests to stand upright, look into the camera and keep their face clearly visible.
2. Encourage a natural smile with visible teeth
Where appropriate for the effect, ask guests to smile naturally and show their teeth. When teeth are not visible in the original image, the AI may need to guess what they look like if the generated result includes an open smile. That guess may not closely resemble the guest.
A clear, natural smile gives the model more information and often produces a more recognisable result.
This does not mean every effect needs a large smile. Serious cinematic portraits, editorial images and character transformations may call for a more neutral expression. The key is to make sure the original expression supports the intended output.
3. Ask guests to remove caps and hats
Unless the hat is intentionally part of the final effect, ask guests to remove caps, hats and other items that cover the hairline. When the original hair is hidden, the AI has to invent or estimate the guest’s hairstyle. This can lead to a final image that looks less like them.
The same principle applies to:
- large sunglasses
- masks
- hair covering most of the face
- hands placed over the forehead or cheeks
- props held in front of the face
The more facial and hair information visible in the original capture, the more information the AI has to work with.
4. Keep hands away from the face
Guests should avoid covering their face with their hands. Hands placed across the mouth, eyes, cheeks or forehead can make it difficult for the AI to identify the full facial structure.
Also avoid poses where:
- one guest’s hand covers another guest’s face
- a prop blocks the mouth or eyes
- fingers overlap important facial features
- arms cross directly in front of multiple people
Simple, open poses are generally more reliable than complex poses with heavy overlap.
5. Avoid exaggerated expressions and awkward poses
Funny faces may be entertaining in a traditional booth photo, but they can make AI transformations less predictable. Expressions such as:
- sticking out the tongue
- dramatically widening the eyes
- heavily scrunching the face
- puffing out the cheeks
- covering the mouth while laughing
may distort the facial information available to the AI.
Guests should also avoid extreme leaning, twisting, crouching or overlapping unless you have specifically tested the effect with those poses.
You can still encourage personality. The goal is not to make every guest stand rigidly. It is to keep their face, body and position clear enough for the AI to interpret correctly.
6. Arrange groups in a clear row
For group AI effects, ask guests to stand next to one another in a clear row. Snappic’s face detection reads faces from left to right. When two guests are crouching significantly lower than the others, standing behind someone, or arranging themselves at very different heights, the face order can become less clear.
This may result in:
- faces being applied to the wrong bodies
- guest identities being swapped
- incorrect clothing assigned to a person
- bodies or limbs merging
- people being omitted
- unexpected changes to the group arrangement
For the most reliable result:
- keep all faces clearly visible
- place guests side by side
- avoid having some people crouch far below the others
- avoid stacking faces vertically
- avoid guests standing directly behind each other
- leave a small amount of space between bodies
- keep everyone at a similar distance from the camera
- make sure one person is not blocking another
A slightly curved row is usually fine, provided the faces still read clearly from left to right.
7. Use good lighting
Good lighting is essential. The AI needs a clear source image to identify faces, skin tone, hair and clothing.
Avoid:
- faces hidden in deep shadow
- very bright light directly behind the guests
- harsh light that blows out facial details
- heavy colour casts
- excessive motion blur
- low-resolution or heavily compressed captures
Even, flattering light across every guest’s face gives the AI more reliable information.
For groups, check that the people standing at the edges are not significantly darker than the guests in the centre.
8. Keep the image sharp
A clear original image generally produces a better AI output. Before the event, confirm that:
- the camera is focused correctly
- the shutter speed is suitable
- guests are not moving during capture
- the lens is clean
- the camera framing matches the selected aspect ratio
- the lighting is strong enough to avoid blur
- the guest’s face is large enough in the image
If the source photo is soft, dark or heavily blurred, the AI may invent facial details rather than accurately transforming the guest.
9. Match the booth pose to the intended effect
Think about the final transformation when directing guests. For example:
- A magazine cover may work best with a confident, upright pose.
- A superhero transformation may suit a strong stance with arms slightly away from the body.
- A professional headshot should use a simple forward-facing posture.
- A group sports effect works best when guests stand next to one another rather than piling into a playful group pose.
- A full-body fantasy scene needs enough space around the guest for the AI to build the outfit and environment.
Where possible, upload a preview image or show guests an example of the desired pose before they take their photo.
AI Prompting for Individuals and Groups
Individual portraits are generally easier for an AI model than group transformations. With one guest, the AI only needs to interpret one face, one body and one set of clothing. With groups, it must maintain several identities while also generating a new scene.
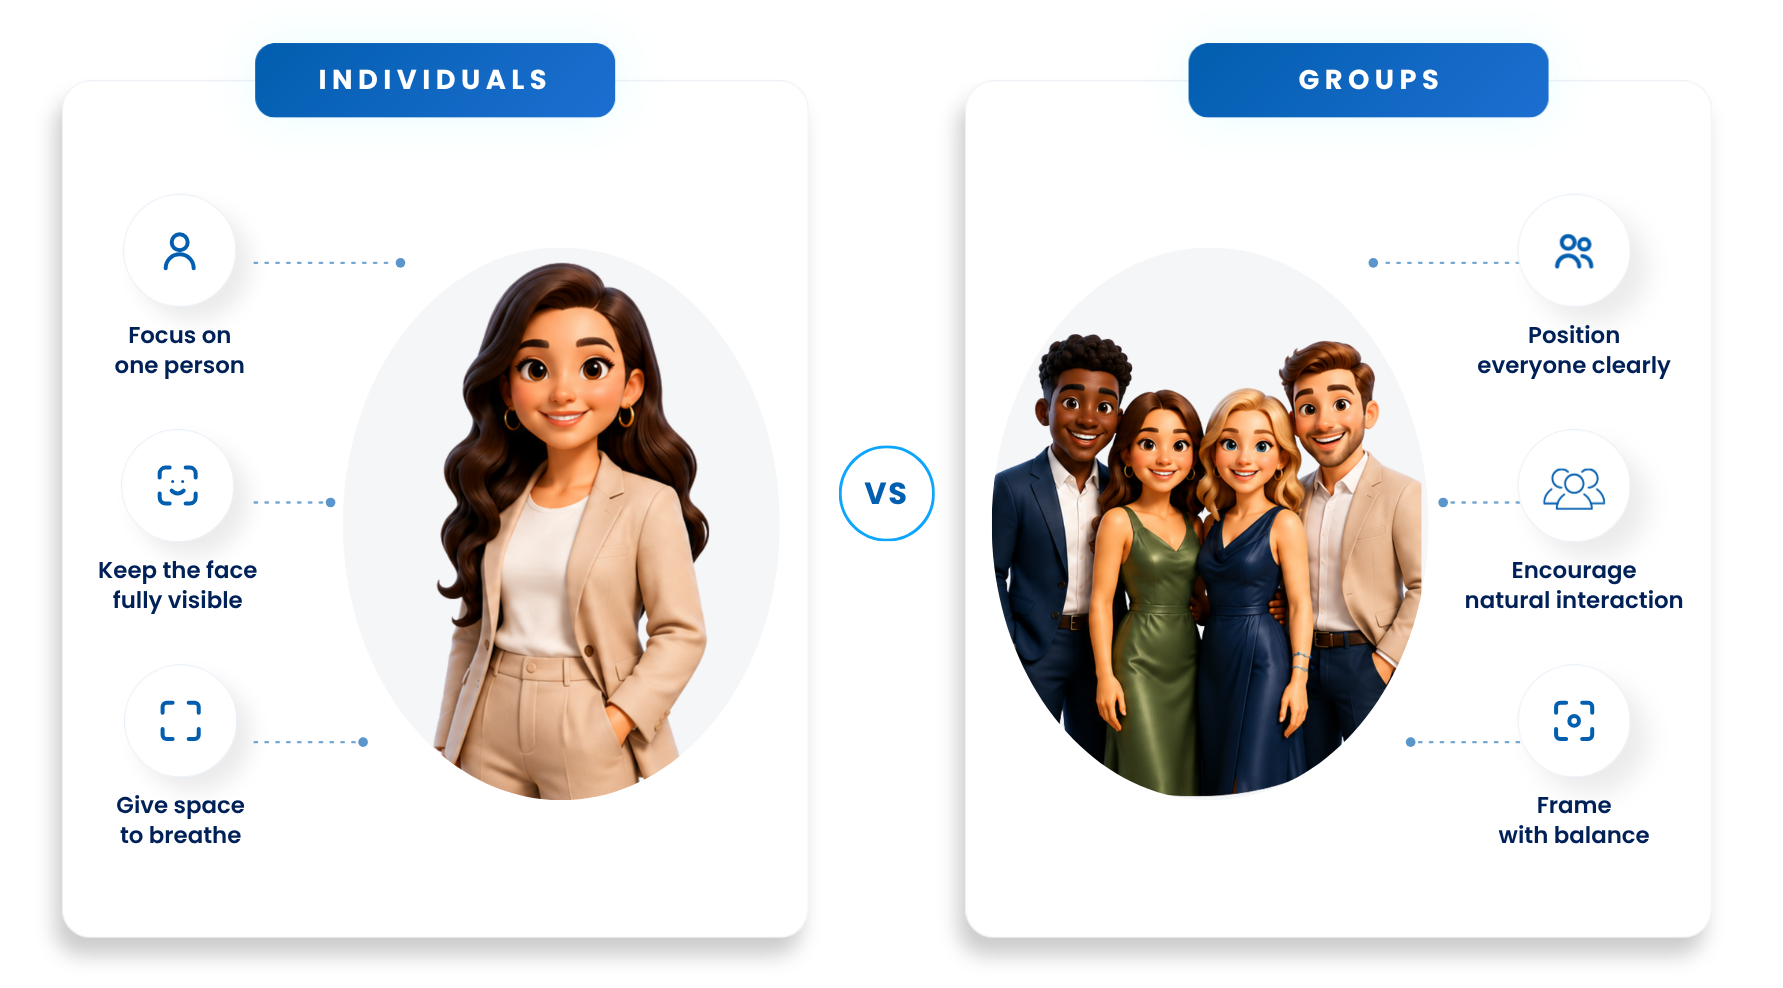
For better group results:
- use simpler transformations
- avoid radically changing every person’s pose
- keep the group arrangement similar to the original image
- state that each guest should remain separate and recognisable
- specify that the same number of people must remain
- avoid crowded foreground characters
- test using the same approximate group size expected at the event
A useful group instruction might be:
Transform all visible guests into members of an elegant futuristic crew. Keep the same number of people as the original photo, preserve each guest as a clearly separate and recognisable individual, and maintain their left-to-right order. Show them standing side by side facing the camera. Do not swap faces, merge bodies, add additional foreground people or obscure any guest.
Groups are still more challenging, even with a strong prompt. Testing is essential.
Should you use Negative Instructions in your Prompt?
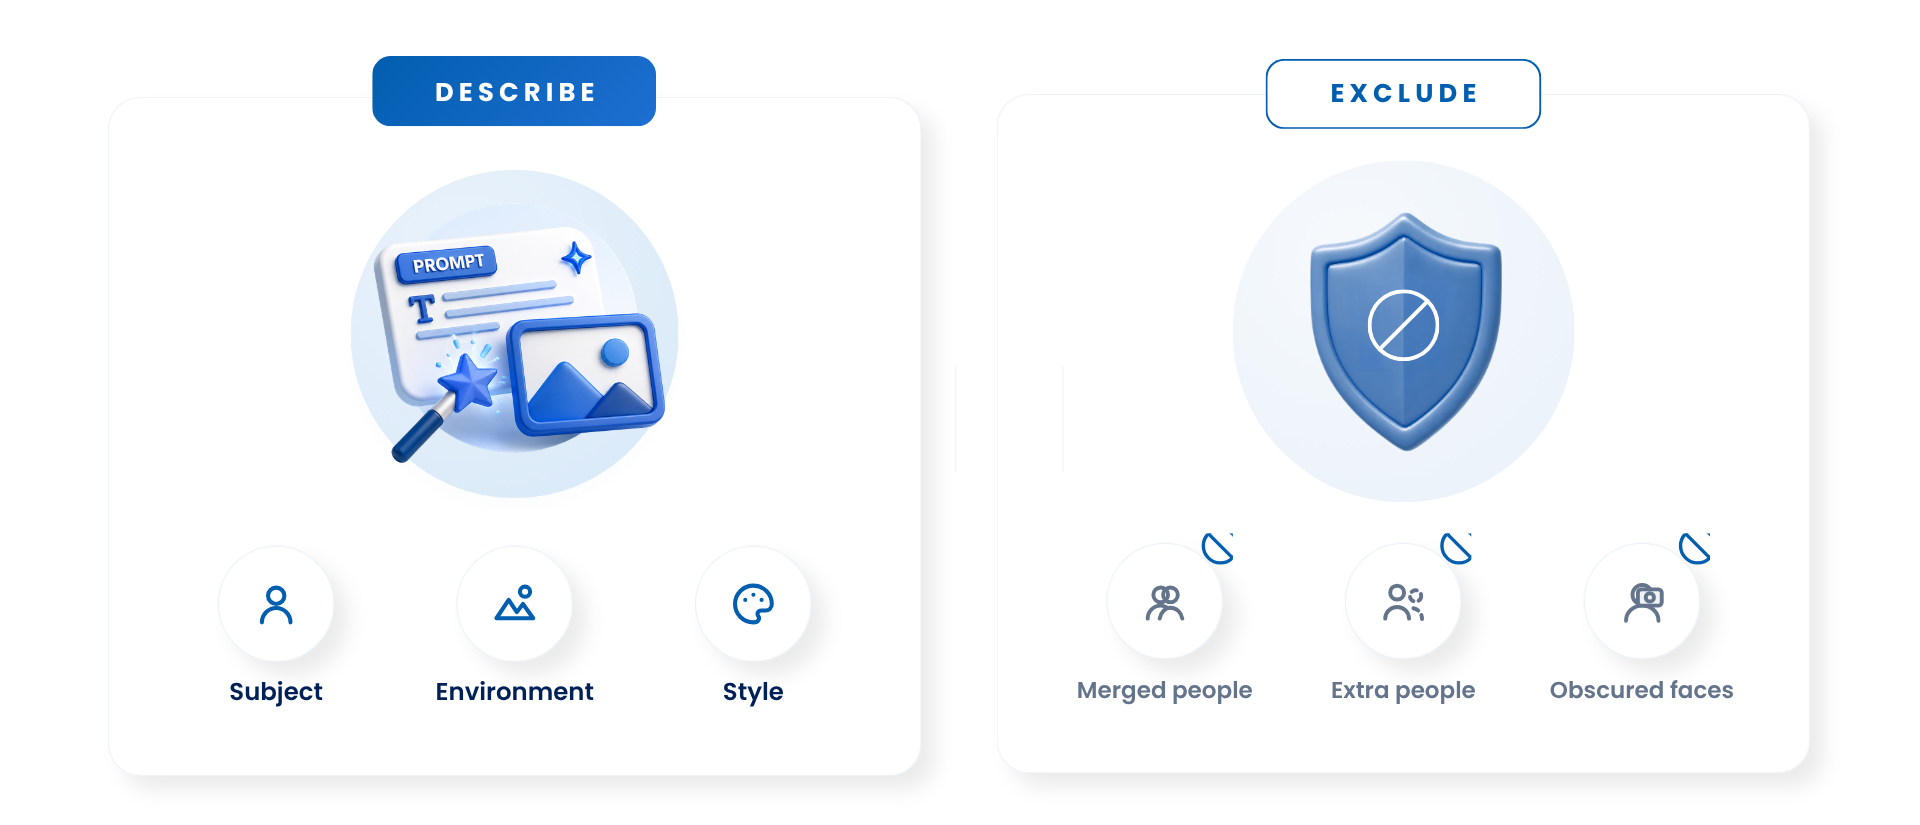
Negative instructions can help reduce recurring issues, but they should not become the main part of the prompt.
Start by positively describing the result you want:
Show each guest as a separate person with a natural face, clearly visible hands and unobstructed features.
Then add a short set of exclusions where necessary:
Do not merge bodies, swap faces, add extra limbs or place objects over the guests’ faces.
Your negative instructions should be based on what you see during testing. For example, if the model repeatedly adds background characters, add:
Do not add additional foreground people.
If faces are becoming heavily stylised, add:
Avoid exaggerated facial proportions and preserve natural facial features.
If accessories keep covering the guest’s face, add:
Keep all hats, masks, glasses and decorative elements away from the eyes and mouth.
Avoid copying long, generic negative prompts from the internet. They may include irrelevant instructions and can make the prompt harder to interpret.
Avoid Contradictory Instructions when Prompting
A common mistake is trying to fit too many visual ideas into one effect.
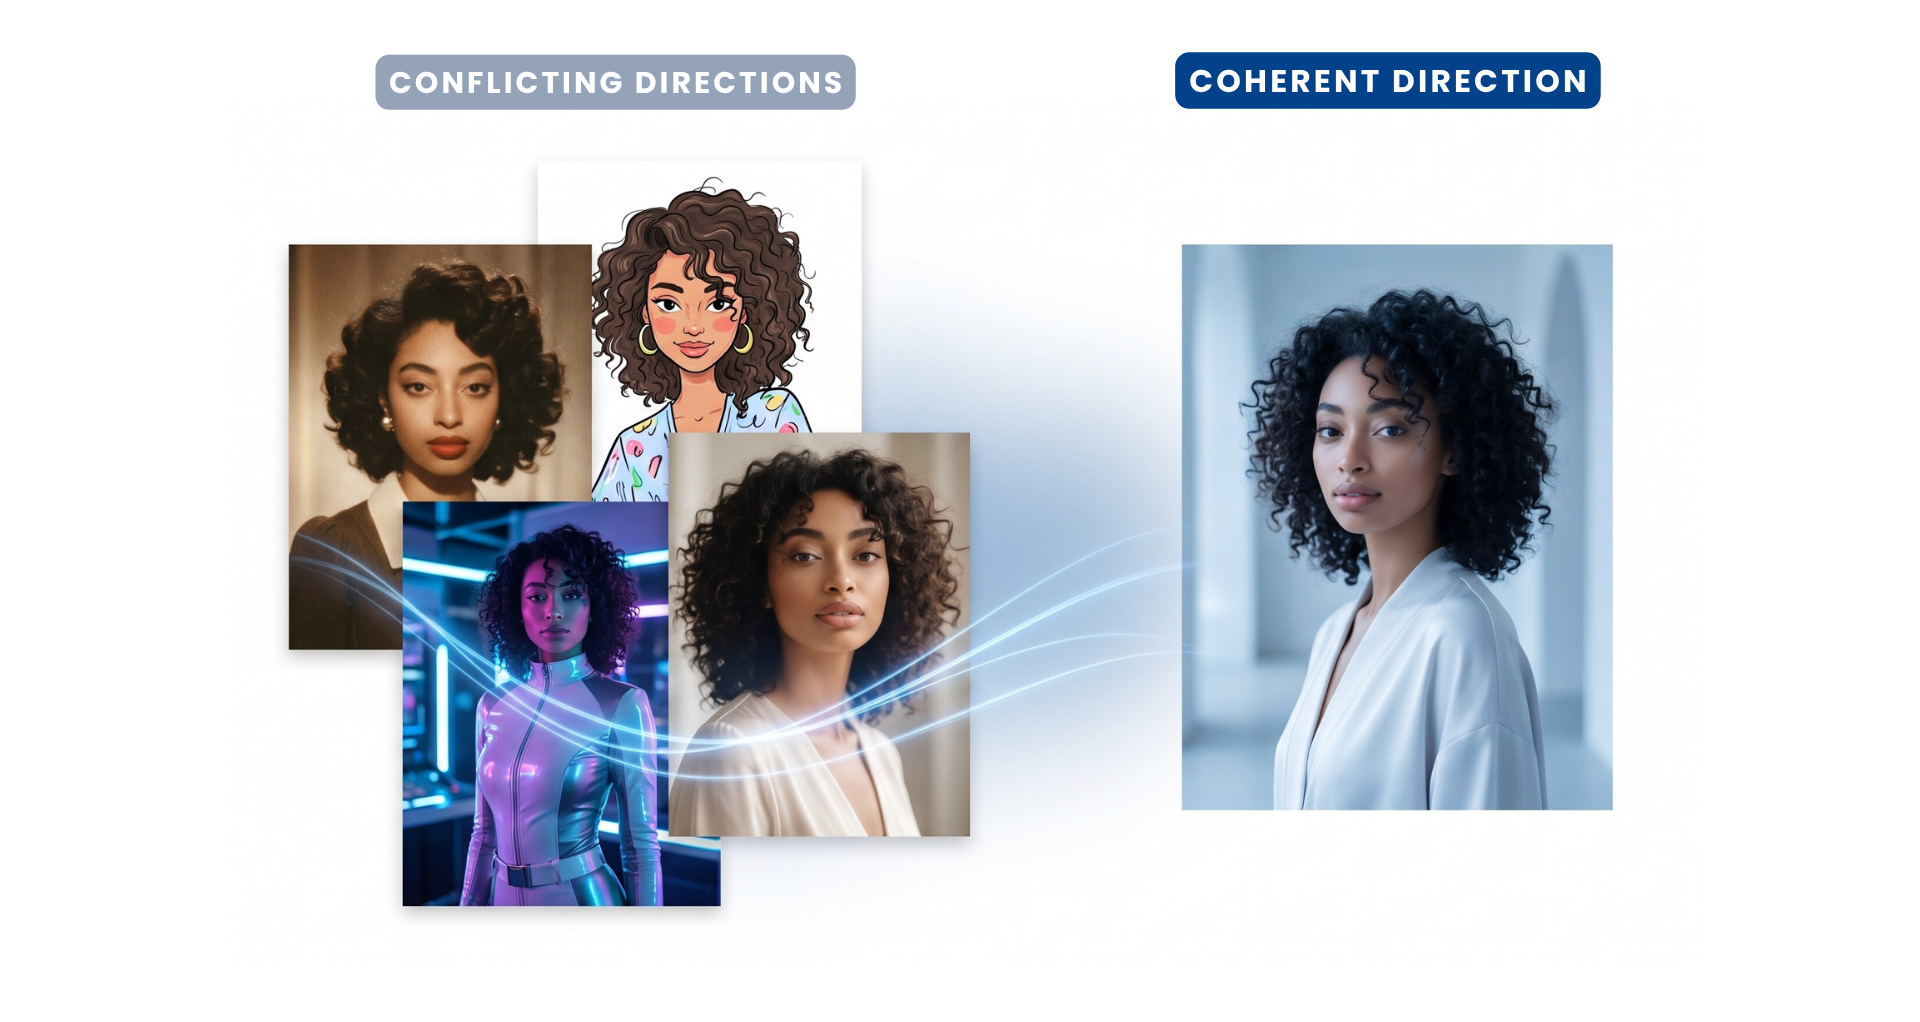
Minimalist, highly detailed, vintage, futuristic, cartoon, photorealistic, soft, dramatic, neon and natural.
These directions compete with one another. Instead, decide which elements matter most.
A more coherent direction might be:
Photorealistic futuristic fashion portrait with minimalist silver styling, soft blue lighting and clean editorial composition.
You can combine styles, but they should complement one another.
For example:
Vintage 1980s fashion photography with modern editorial lighting.
Or:
Cinematic portrait photography with subtle oil-painted textures.
The AI should be able to understand which style is dominant and which style is only an influence.
Be careful with Generated Text
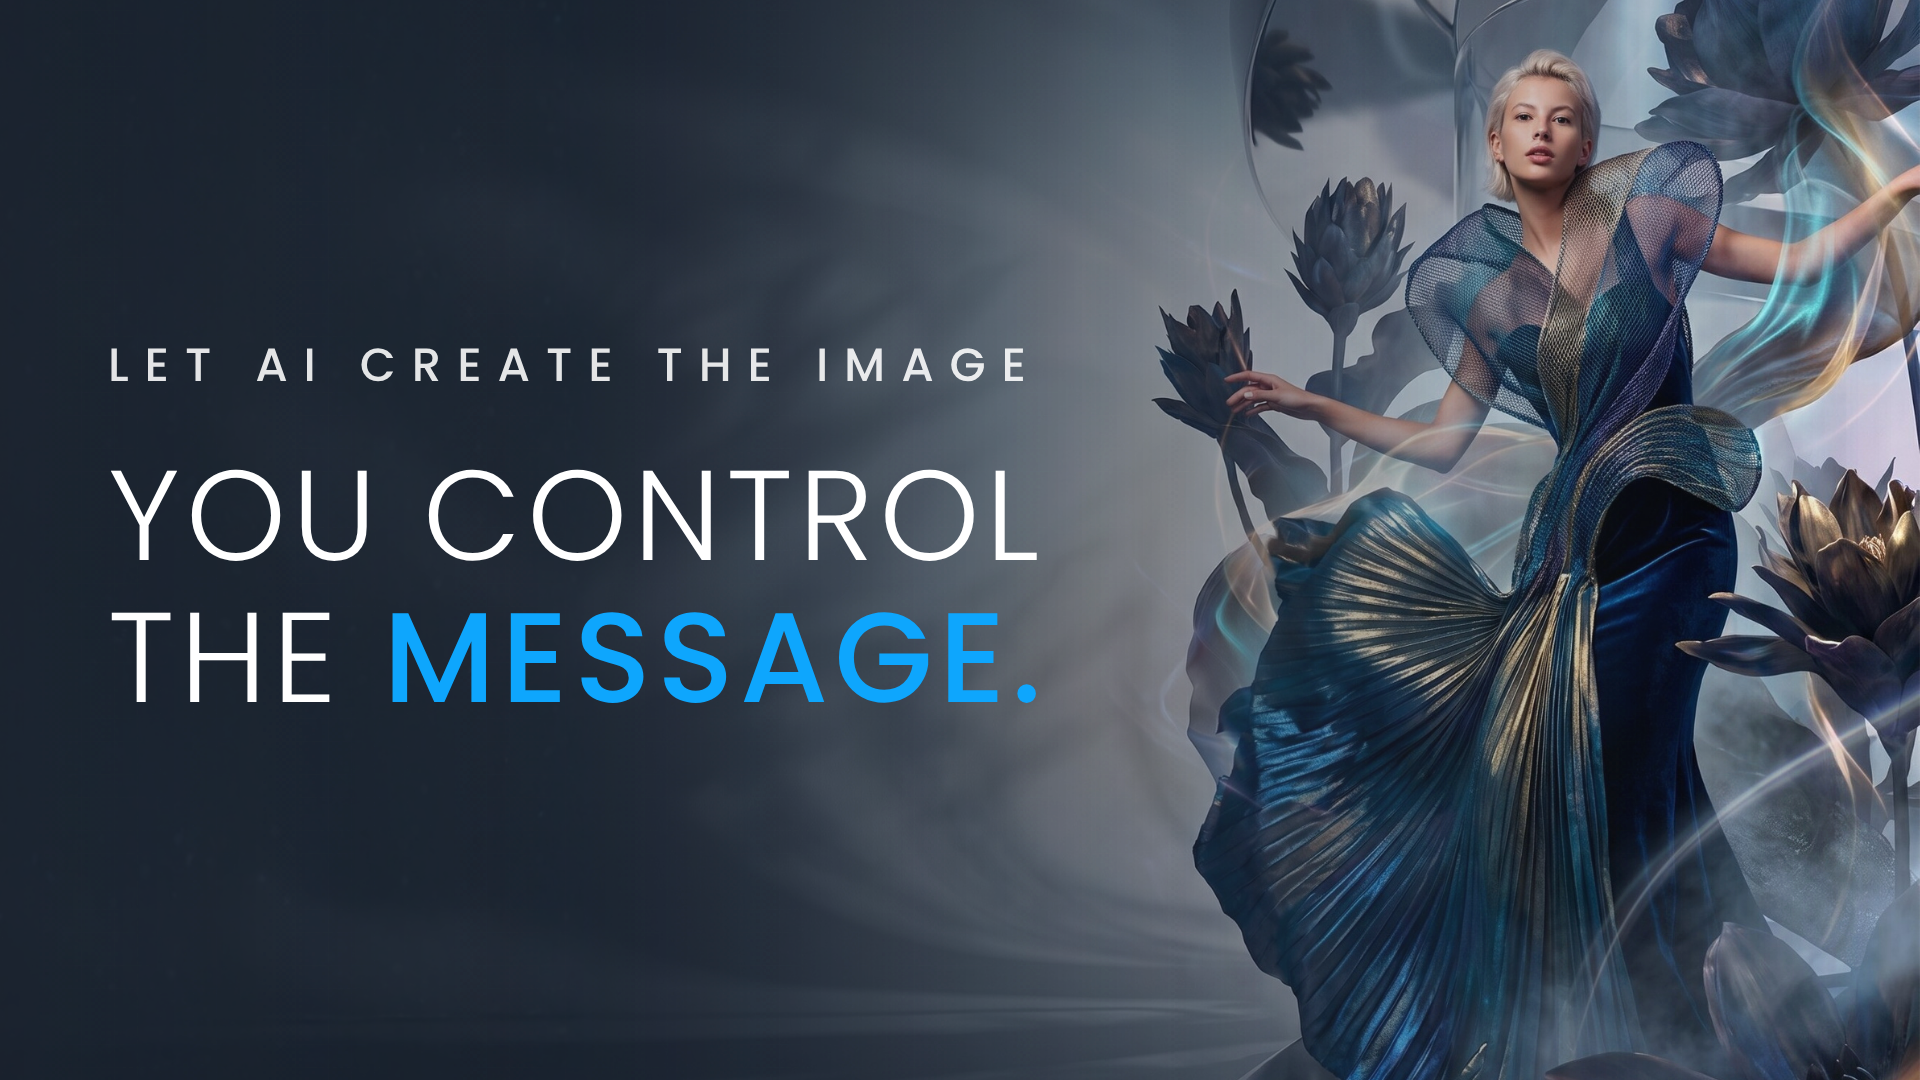
AI image models can create visually interesting text, but spelling and letter consistency may vary.
For important information such as:
- client names
- campaign slogans
- event dates
- sponsor names
- calls to action
- legal copy
- competition details
it is usually safer to generate the visual without critical text and add the correct wording through a Snappic template or overlay.
For a magazine-style effect, you could ask the AI to create the portrait and leave suitable negative space for headlines.
For example:
Compose the guest slightly right of centre and leave clean negative space on the left for a magazine headline to be added later.
This gives you more control over the final design and ensures all wording remains accurate.
Testing your AI effect before the event
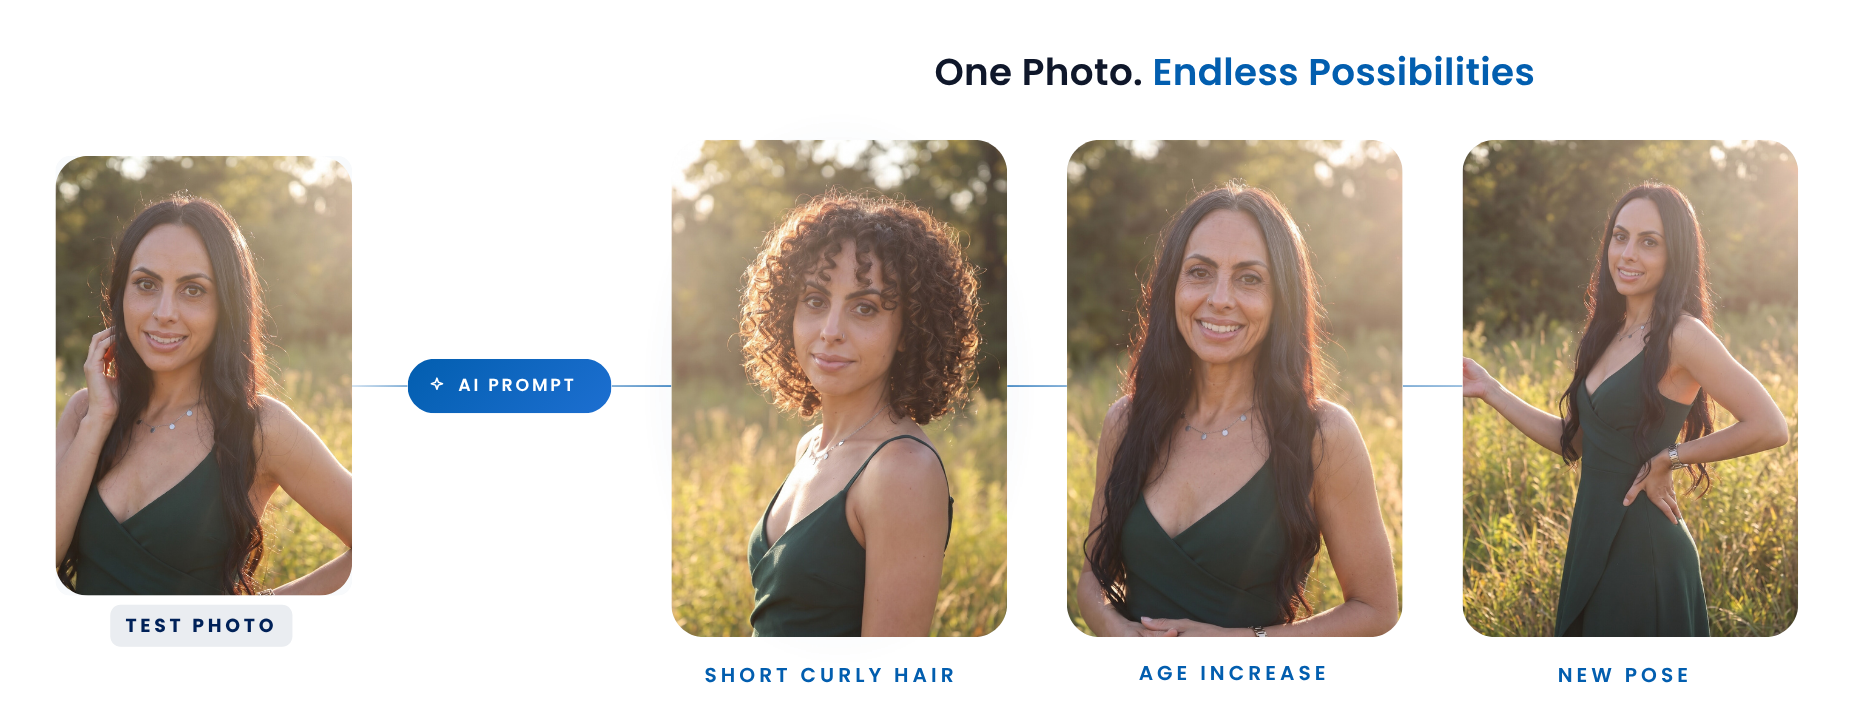
The fastest way to improve a prompt is to test it. Do not test only one ideal photo. Use a selection that reflects the guests you expect at the event, including:
- different skin tones
- different ages
- different hairstyles
- facial hair
- glasses
- individual portraits
- couples
- small groups
- different body types
- light and dark clothing
If the event will include groups, test groups.
If guests will be photographed full length, test full-length photos.
If the booth lighting will be different from your usual setup, test under similar lighting conditions.
Ask:
- Does the guest still look recognisable?
- Is the transformation clear?
- Does the clothing change as intended?
- Is the pose appropriate?
- Do all images feel like part of the same collection?
- Is the background consistent?
- Are additional people being added?
- Are group members staying in the correct order?
- Are faces or bodies being swapped?
- Are any elements covering the face?
- Does the framing work with the selected aspect ratio?
- Is there enough room for the final template?
Change one or two instructions at a time. If you rewrite the entire prompt after every test, it becomes difficult to identify which change improved or worsened the result.
Using Snappic’s AI Effects Workspace
The AI Effects Workspace brings the main setup and testing controls together in one place.
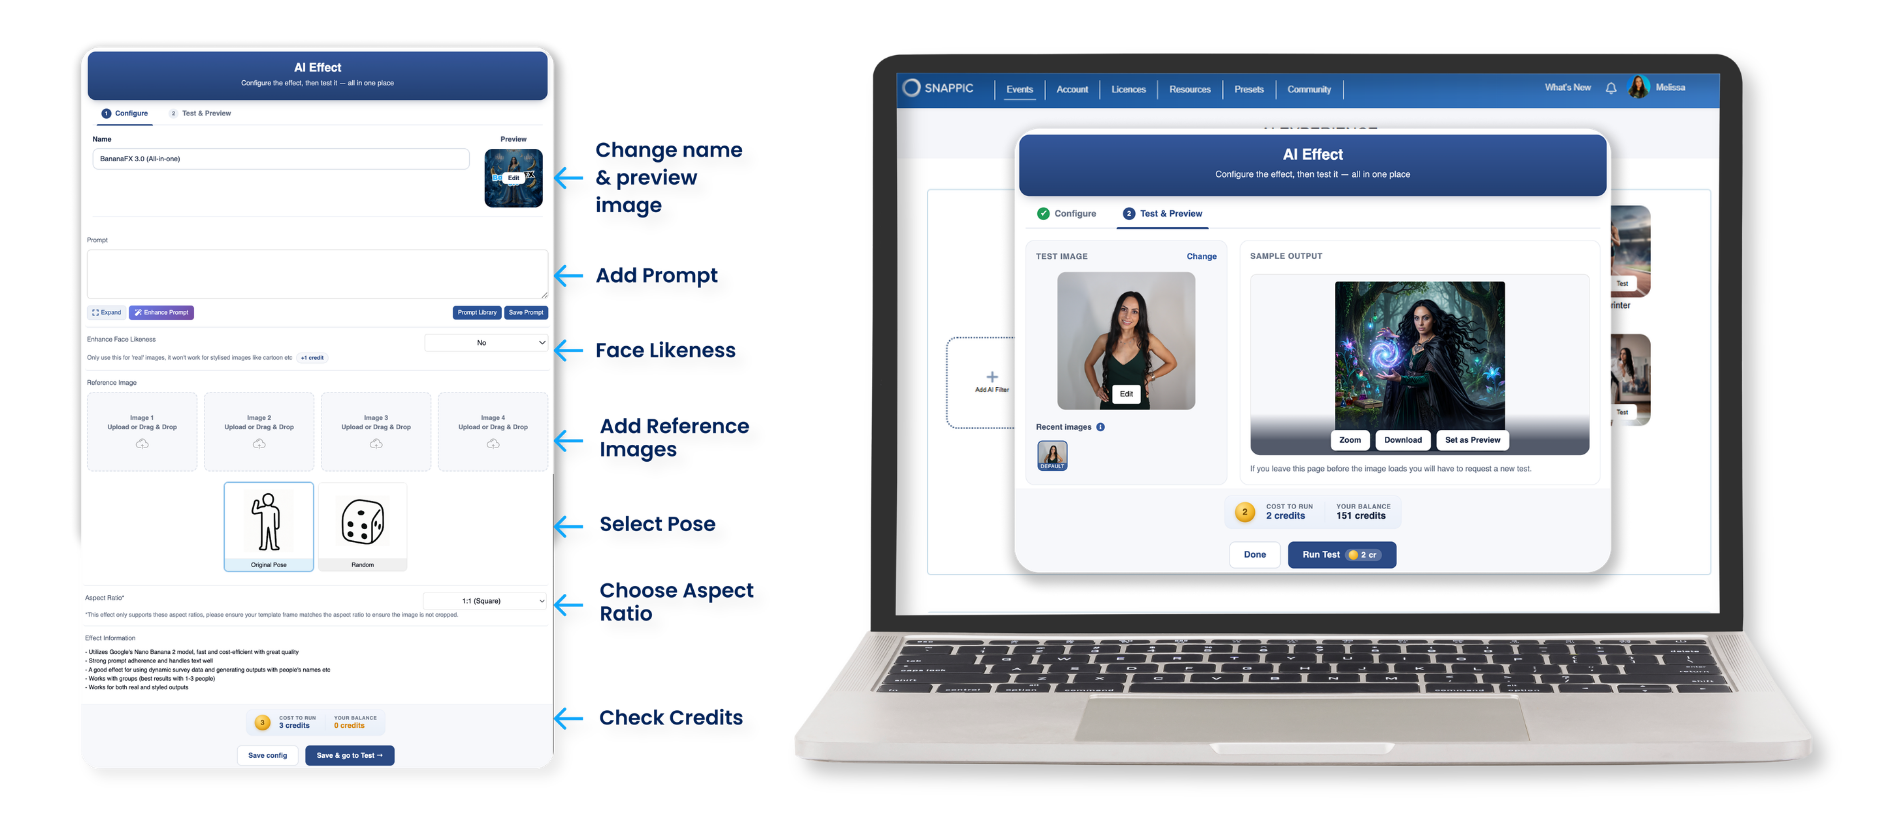
From the workspace, you can:
- name and organise your effect
- write and edit your prompt
- select the AI model
- add optional reference images
- enable Enhance Face Likeness where appropriate
- choose a pose setting
- choose an aspect ratio
- test the effect
- reuse recent test images
- review the credit cost before generating
- monitor your remaining credits while refining the result
BananaFX 2.0, BananaFX 3.0 and PersonaFX 2.0 combine the previous standard and reference-image workflows, allowing you to create with or without reference images from the same filter setup.
This makes testing and iteration easier. You can adjust your wording, reuse the same test guest and compare how each change affects the final result.
Before publishing your filter, test the complete workflow rather than only the generated image. Check the preview, template placement, sharing method and printing setup.
Common AI prompt problems and how to fix them
The result does not match the idea
The prompt may be too vague or may include competing instructions.
Check whether you have clearly described:
- the guest
- the transformation
- the outfit
- the pose
- the environment
- the visual style
- the camera framing
- the important constraints
Reduce unnecessary descriptive words and make the main creative direction clearer.
The guest does not look enough like themselves
Check the original guest photo first.
Make sure:
- the face is clear and well lit
- the guest is facing forward
- the hairline is visible
- the face is not covered
- the image is sharp
- the expression is not heavily exaggerated
You can also:
- enable Enhance Face Likeness for suitable realistic effects
- reduce heavy facial stylisation
- ask the prompt to preserve recognisable facial features
- avoid dramatically changing the guest’s age
- avoid extreme pose changes
- test a model better suited to the desired style
Faces are being swapped in group photos
The group arrangement may be confusing the face-detection order.
Ask guests to:
- stand side by side
- remain at similar heights where possible
- avoid having some people crouch far below the rest
- avoid stacking faces vertically
- keep faces clearly visible
- remain in a clear left-to-right order
In the prompt, ask the AI to:
Maintain the guests’ original left-to-right order and keep each person as a separate, recognisable individual.
Every image looks different
Some variation is normal. AI generates a new image rather than applying an identical fixed overlay.
To improve consistency:
- make the prompt more specific
- reduce conflicting descriptions
- use reference images with a clear purpose
- specify the same lighting, environment and composition
- use a previously successful result as a visual reference where appropriate
- keep the booth pose and framing consistent
- test across multiple guest types
The goal is usually a coherent collection, not a set of completely identical images.
The AI adds extra people
Make the subject count clear.
For example:
Keep only the guests visible in the original captured photo. Do not add additional foreground people.
Background crowds may also confuse the composition, especially in group effects. Where possible, describe background figures as distant, blurred or absent.
The outfit does not change enough
State explicitly that the original clothing should be replaced.
For example:
Completely replace the guest’s current outfit with a sculptural futuristic silver gown.
Describe:
- silhouette
- colour
- material
- accessories
- theme
- level of formality
Reference images can also help guide a specific wardrobe concept.
Important objects are missing
The object may not be clearly connected to the guest’s action.
Instead of:
A cauldron in the scene.
Try:
Place a large ornate iron cauldron directly in front of the guest. Show the guest holding a glowing plant above it as they prepare to drop it into the bubbling potion.
Explain where the object is, how large it is and how the guest interacts with it.
The result is illustrated when you wanted realism
Use direct language such as:
Photorealistic image, realistic human skin, live-action cinematic photography, not an illustration.
Avoid descriptors that strongly imply illustration, such as:
- painted poster
- graphic novel artwork
- hand-drawn
- concept art
- digital painting
Also check whether your reference images are illustrated. The model may follow their visual style.
The composition is cropped incorrectly
Specify the framing:
- close-up
- head and shoulders
- waist-up
- three-quarter length
- full body
For full-body results, you can add:
Show the guest from head to toe with space around their entire body. Do not crop the feet or top of the head.
Make sure the original capture and selected aspect ratio also give the AI enough room to create the requested composition.
Example AI photo booth prompts
Corporate innovation event
Transform the visible guest into a confident technology leader while preserving their recognisable facial features, skin tone, approximate age and body type. Dress them in a tailored modern suit with subtle metallic details inspired by the client’s blue brand colours. Show them in a polished waist-up pose facing the camera inside a sleek innovation lab with transparent displays, soft holographic data visualisations and refined architectural lighting. Use photorealistic corporate editorial photography, natural skin texture, crisp facial focus and clean blue accent lighting. Keep only the guests visible in the original photo. Do not add fantasy creatures, additional foreground people, unreadable text or objects covering the face.
Elegant wedding effect
Transform the visible guest into a romantic high-fashion wedding guest while preserving their recognisable facial features, skin tone, approximate age and body type. Replace their current clothing with an elegant formal outfit in soft champagne, ivory and muted floral tones. Show them in a graceful waist-up portrait facing the camera inside a candlelit garden reception with delicate flowers, warm string lights and softly blurred tables in the background. Use luxurious wedding editorial photography, warm flattering light, natural skin texture and a gentle background blur. Keep the guest clearly recognisable and do not add veils, masks, large hats or accessories covering the face.
Retro movie star
Transform the visible guest into the star of a glamorous 1980s science-fiction film while preserving their recognisable facial features and approximate age. Dress them in a dramatic metallic jacket with bold structured shoulders and refined retro-futuristic styling. Show them in a confident three-quarter portrait facing the camera, standing inside a neon-lit city with glowing signs, reflective streets and cinematic blue-and-magenta lighting. Use realistic live-action movie photography with subtle film grain, dramatic rim lighting and crisp facial detail. Do not turn the image into an illustration, add additional foreground people or include generated text.
Fantasy group transformation
Transform all visible guests into members of an elegant magical council while preserving each person as a separate and recognisable individual. Maintain the same number of guests and their original left-to-right order. Dress each guest in a distinct but coordinated fantasy outfit using deep green, gold and midnight blue fabrics. Show them standing side by side facing the camera inside a grand enchanted library with glowing books, tall arches and floating golden lights. Use photorealistic cinematic fantasy photography with realistic faces and warm dramatic lighting. Do not swap faces, merge bodies, add extra guests, hide any face or place large props in front of the group.
Pre-event AI prompt checklist
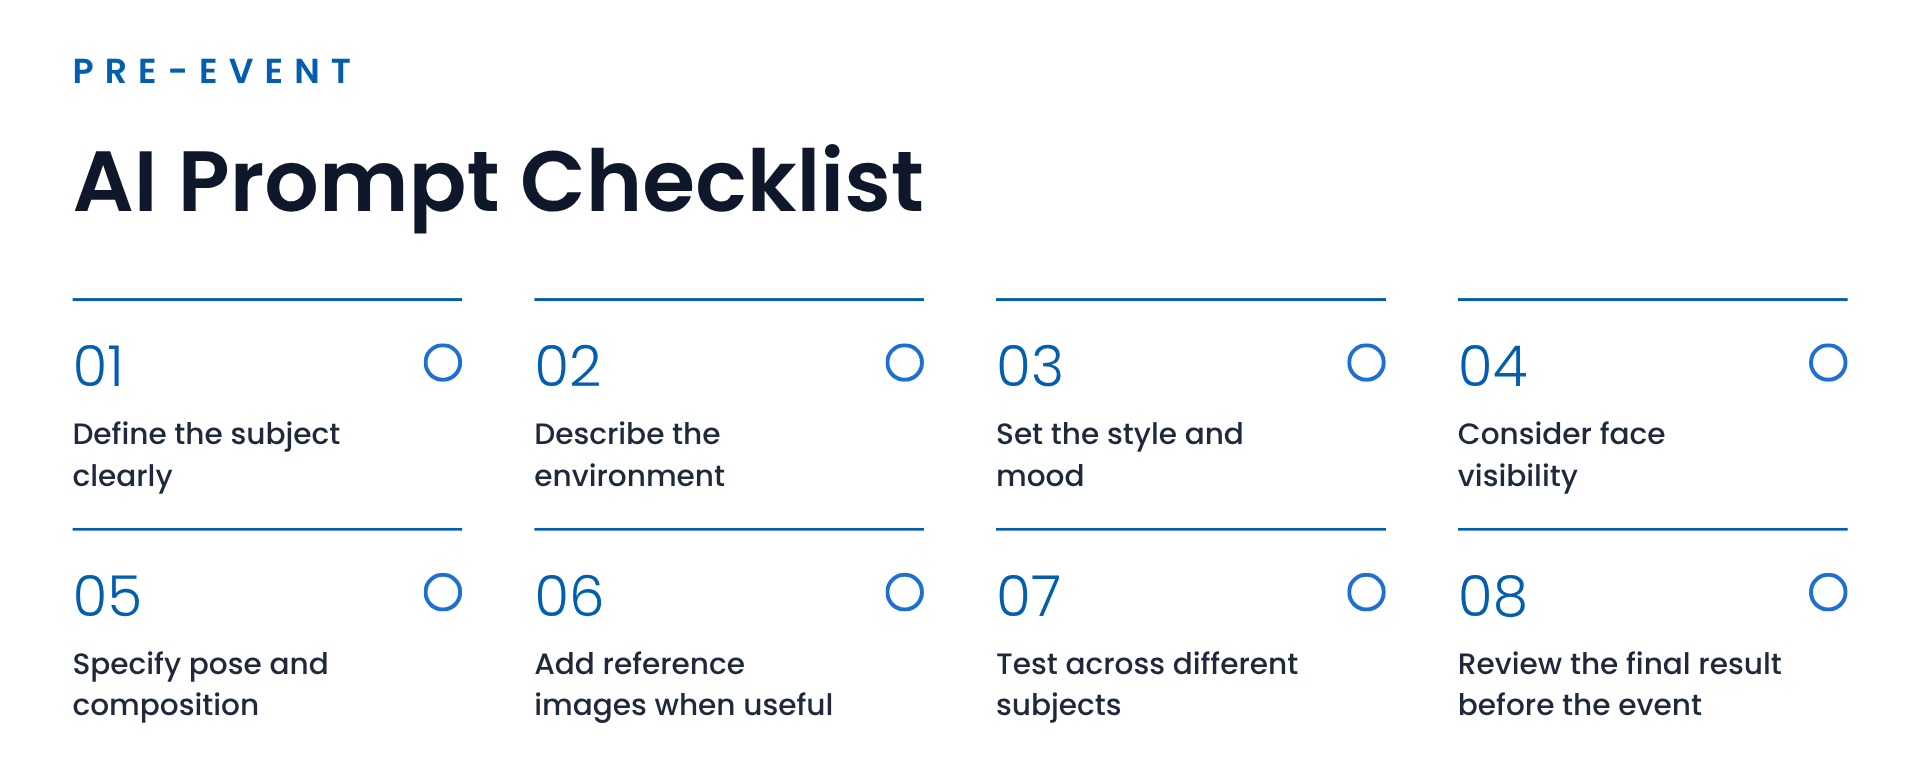
Before the event, confirm that:
- AI-FX is enabled and the correct filter is attached to the event.
- The prompt has been tested using more than one guest.
- Group effects have been tested with the expected group size.
- Reference images support one clear visual direction.
- Enhance Face Likeness has been tested where appropriate.
- The selected pose and aspect ratio suit the booth framing.
- Guests can see or understand the recommended pose.
- The camera produces clear, sharp and well-lit photos.
- Preview images have been uploaded for each effect.
- Templates do not cover important parts of the generated image.
- Email, SMS, printing or other selected delivery methods have been tested.
- Your internet connection is suitable for AI processing.
- The client understands that generation time and results may vary.
- A reliable backup effect is available if a custom filter needs to be replaced.
Build a reusable prompt library
As you create and test more effects, save the prompt structures that work well.
You might organise your library into categories such as:
- corporate headshots
- magazine covers
- wedding portraits
- seasonal effects
- fantasy characters
- sports transformations
- children’s events
- luxury editorials
- branded activations
- group effects
Do not reuse every prompt word for word.
Use the structure as a starting point, then customise the transformation, environment, colours and styling for each client.
Over time, this helps you create a recognisable visual style while reducing the amount of setup required for future events.
Final thoughts
Writing a strong AI photo booth prompt is not about adding as many descriptive words as possible.
It is about giving the AI a clear creative direction.
A reliable prompt explains:
- who the guest is
- what should remain recognisable
- how they should be transformed
- what they should be doing
- where they should appear
- how the final image should look
- what the model should avoid changing
The original guest photo is just as important.
Clear faces, forward-facing poses, visible hair, natural expressions, good lighting and properly arranged groups all give the AI better information to work with.
The best results come from combining a thoughtful prompt with a strong source image, suitable model settings, relevant reference images and proper testing before the event.
With Snappic’s AI-FX tools and AI Effects Workspace, operators can move beyond generic filters and build experiences designed specifically for each event, client and audience.
Related articles
- How to Set Up AI-FX
- AI-FX Advanced Filters
- AI Photo Glam
- Snappic’s Biggest AI-FX Launch
- The Ultimate Guide to Using AI in Your Photo Booth Business
- PersonaFX
- AI-FX on Snappic
FAQs
1. What is an AI photo booth prompt?
An AI photo booth prompt is a written instruction that tells an AI image model how to transform a guest’s photo. A strong prompt can define the subject, environment, lighting, composition, style and other visual details to create a specific AI photo booth effect.
2. How do you write a good AI photo booth prompt?
Start by clearly defining the subject and what should remain recognisable, then describe the environment, lighting, composition, style and important details. The more clearly your prompt communicates the intended result, the more consistently the AI can produce the effect.
3. How can I get more consistent AI photo booth results?
Test your AI effect using different subjects, ages, hairstyles, poses, groups and lighting conditions before an event. Clear prompts, appropriate reference images and thorough testing can help identify inconsistencies before guests use the effect.
4. Can I use reference images in an AI photo booth prompt?
Yes. Reference images can help guide the AI towards a particular environment, outfit, visual style, lighting setup or other creative element. They can be especially useful when a visual is difficult to describe accurately using text alone.
5. How do AI photo booth effects work?
AI photo booth effects use an AI image model to transform a guest's original photo according to a prompt and, where appropriate, reference images. The prompt provides the creative direction while the model generates a new image based on those instructions.
6. What should I test before using an AI photo booth effect at an event?
Test the effect across a variety of real-world photos, including different ages, hairstyles, body types, lighting conditions and group sizes. Check that faces remain recognisable, the composition works as intended and the final output is suitable for the event.
More from Melissa
Previous Post
What Five Years of Photo Booth Support Taught Matthew
Learn practical photo booth support and troubleshooting tips from Matthew, including camera setup, printing issues, AI-FX problems and event-day preparation.
Next Post
Ten Years of Snappic: The Nightclub Idea That Became a Photo Booth Platform
Explore how a failed nightclub idea grew into Snappic’s global photo booth platform and see how photo booth software evolved to power modern events